Sunday, April 24, 2022

Red Aventurine Order Going Out

Aventurine represents Creativity, Prosperity, and Practical Enthusiasm.

https://www.etsy.com/listing/650213859/red-aventurine-nugget-side-comb-70mm

Saturday, September 29, 2018

Resin Experiments Follow-Up

My little jar had tiny air bubbles throughout. They aren't hideous - they actually look like little sparkles. You have to look for them, but they're there. So I thought next time I try that, I'd use an actual casting resin, rather than a doming resin. I'm still experimenting and looking for the perfect casting resin for that type of project.


AMAZING 2-Part Epoxy Casting Resin, 8-oz. kit
This two-part clear coating and casting resin is easy to use.
It's great for small items and pieces less than 3/8" thick and excellent for doming bezels or polymer clay pendants and medallions. However, it’s just thick enough that if you use this for cast items thicker or deeper than the recommended 3/8 inch, you are likely to notice tiny air bubbles in your finished product.

You use it like this:
Combine equal parts of Part A and Part B, as measured out in your mixing cups. I find it helpful to mark the increments I want to pour to with a magic marker, like so: (whoops, I forgot to get that picture! Will edit and add that photo tomorrow when the light is better!)

Stir slowly and gently for 2 to 3 minutes, so as to avoid introducing too many air bubbles into your resin. A popsicle stick is perfect for this. I recommend you use the plain wooden popsicle sticks and not the brightly colored dyed ones unless you're okay with some of that color transferring into your resin. 
Plain wooden popsicle sticks

Once combined, you have up to 30 minutes working time, so allow the mixed resin to rest 5 to 10 minutes in order to release air bubbles before pouring onto your piece or into your mold. 

Once you’ve poured your resin, watch for air bubbles to emerge on the surface of your resin. When those appear (and they will!) there are a few ways to deal with them:
  1. You can blow on them gently with your mouth. I've heard it’s the carbon dioxide in your breath that pops the bubbles.
  2. You can blow on them gently with a drinking straw. This concentrates the breath (and CO2), and is a little more effective than simply blowing on them.  
  3. You can use a flame, like from a long-neck lighter or a cooking torch, to EVER SO LIGHTLY AND QUICKLY brush the tip of the flame across the resin surface. There's a link to a video below that shows this technique. You'll want to see how it's done before attempting this method, as it is easy to get carried away with the flame and cause a fire hazard.
Pieces can generally be de-molded in 18 to 24 hours, but will still be what I call "tender" - they may feel firm, but you can accidentally imprint or damage the surface of the resin even though it seems hard - so allow the finished piece to cure a good 48 hours before any sanding, polishing, drilling, or other rough handling.

Use a release agent when using a non-silicone mold for resin casting.

Sunday, September 23, 2018

Ice Resin Experiment


Here's what I did today
The last time I did a resin project, I was using a workspace out in the garage. It's a perfectly nice workspace, but apparently it had been longer than I realized since I'd been out there. 
A couple of reasons for that - one, I've been negotiating with my hip for comfort and mobility. Unfortunately, it's been a rather demanding and hard-to-please hip. And while my garage space is a very nice creative space, it isn't quite the friendliest place for a sore and difficult hip to hang out. Secondly, Mother Nature got mixed up and sent us Tuscon's summer this year (we're in Fort Worth). So many days over 100, days in the one hundred teens - It was pretty rugged. I'm certainly grateful for air conditioning. That said, I know I didn't make any work-days in the garage this year, and it may have been a bit longer than I realized. 

I recently had occasion to make some shifts and do some rearranging in the house and, in the process, opened up a creative space right here inside (yay!). So today I went out to the garage to collect some resin-project materials to do a project. 

When I'm working with Ice Resin, I often prop the bottles upside-down in plastic cups (one for the resin, and a second one for the hardener) so the material, which is pretty thick, will already be at the "top" of the bottle and ready to pour into my measuring cup. Otherwise, since it is so thick and moves so slowly, it can be a drag to wait for it to come out of the bottle. I have no idea when was the last time I did a resin project, but I know for sure it was before summer, so those bottles stood upside down like that all summer, and then some. 

Ordinarily it wouldn't be an issue. They've got their lids on, and the material has always stayed in the bottles, no problem. But in this summer's heat, something expanded - the air above them?  the resin itself? maybe both - and both the resin and the hardener had seeped out into their respective holding cups.
Resin seeped out of the bottle into the cup
Not the end of the world, but messy, for sure. So Big Lesson Number One is, if you're going to store your resin bottles upside down, you better be using them pretty regularly so they don't have time to make a mess that you'll have to clean up before you start your next project. Big Lesson Number Two is, don't leave them out in the garage during summer, where the heat makes everything expand, guaranteeing that your resin bottles will leak!

Having gotten that all put back in order, I was eager to proceed with some new materials and molds that I recently acquired I will include links to everything at the end of this blog post.

Following is the order of operations for today's projects:

Using Ice Resin, I poured 7.5 ml Ice Resin into a measuring container, and mixed in 1 drop Transparent Teal Resin Colorant into the resin, according to product instructions. 

Then I added 7.5 ml Ice Resin hardener and stirred 2 minutes; then let it rest 5 min, again, according to product instructions.
I blew emerging bubbles off the surface of the resting resin as they came up. 
Then I poured the base of the Round Trinket Box first (very slowly and carefully, so the resin can seep down the sides and release the air bubbles from there), and then the lid to the round storage box.
I still had a bit of resin left, so I poured 3 Cube Beads

With still a bit of resin left after that, I mixed in some Ice Resin Crystal Opals into the remaining resin, and poured the last 3 cube beads.
Ever little bit I would blow emerging air bubbles off the resin surfaces. 

I noticed several 2-3mm air bubbles that worked their way up from the sides of the round box mold, and found these amazingly resistant to being popped with a tool. I was able to pop them with the corner of an alcohol wipe, which I keep at my work station for cleanup. (As soon as I retrieved my torch, those bubbles stopped appearing!) Next time I make this piece, I will have some kind of slender tool, like a toothpick or a needle tool to work down the sides of the mold and help facilitate the resin in, and the air out. 

I swept the torch flame over all resin surfaces, popping all those tiny air bubbles. I'm checking it about every 20-30 minutes, and right now everything looks as smooth as glass.

All those pieces need to sit at least twelve hours, so I'll post again (with pictures, of course!) once I've unmolded them. See you then!

Supply Links:
Ice Resinhttps://amzn.to/2zpsLiL 
Transparent Teal Resin Colorant - https://amzn.to/2QYQ0H8 
Measuring cups https://amzn.to/2DqS9Zk 
Stir Sticks - https://amzn.to/2xHaTh6 
Silicone Round Trinket Box Mold - https://amzn.to/2zoEgXF
Cube Bead Mold - https://amzn.to/2xxZ51v 
Ice Resin Crystals - https://amzn.to/2DokP53 
Needle Tool - https://amzn.to/2zpLXg4 
Alcohol Wipes - https://amzn.to/2xB2pbY
Torch - https://amzn.to/2xxDNRC 
Torch Fuel - https://amzn.to/2zpqcNo 
Non-Stick Silicone Craft Mat -  https://amzn.to/2xzqqAq 
Latex-Free Disposable Gloves - https://amzn.to/2DnLKy7 


Friday, August 17, 2018

Quick Stretchy Bracelet How-to (Refresher)


A very informal, quick refresher on making stretchy bracelets.
(There is an introductory narrative section before the video begins at :52)

Here is a list of the supplies mentioned in the video. You can, of course, get your supplies wherever you like, but it does help me if you purchase from these Amazon Affiliate links 😉

.5mm stretchy cord: https://amzn.to/2OJNF0F  
Collapsible eye beading needle: https://amzn.to/2vPaIAd  
E6000 Glue: https://amzn.to/2Mu9Avo 

Follow Eight Susquehanna on Facebook
Shop EightSusquehanna.com 

Wednesday, August 15, 2018

Agate


Today we're talking about Agate.

Agate comes in a variety of colors, often striped, or banded.

It is a variety of Chalcedony, which is a member of the quartz family of minerals.

Agate is thought to derive its name from the Achates River in present-day Sicily after having been noticed by the Greek philosopher and naturalist, Theophrastus, somewhere around the third to fourth centuries BC, about 2300 to 2400 years ago.

Agate is composed of silicon and oxygen in various molecular and crystalline forms and arrangements, and has a hardness of 7 on the Mohs scale, making it easier to retain a high shine polish.

Agate is found all over the world, so it's not what you would call rare.

Agate represents Balance, Harmonizing, and Longevity, and is a birthstone for those born in the month of May. 

Agate is one of the gemstones in the breastplate of the high priests of the Old Testament. Several ancient peoples - Babylonians, Mesopotamians, Ancient Egyptian and Chinese cultures - felt that agate was protective. Its perceived benefits ranged from warding off the evil eye, dispelling evil energy, protection from natural disasters and storms, protection from thirst, spiritual protection, and enhancing one's life or fortune, to name a few. Nowadays we consider Agate to represent a gentle healing frequency. If you would like to feel an enhanced sense of pace, balance, and ease of mind, meditate on Agate.
Agate at EightSusquehanna.com Photographed using the Cloud Dome Nimbus

Wednesday, August 8, 2018

Butterflies


Butterflies!
I made these butterflies with .999 fine silver Precious metal clay. They each have a design on the front; some have plain backs, and some have designs on the backs. Precious metal clay is a product that uses very fine particles of, in this case silver, combined with an organic binder. This makes a material that looks and feels a great deal like a fine ceramic clay. You can mold it, and shape it, and and sculpt it, and even carve it, before it’s been fired. When it’s fired, the organic binder burns off, leaving only the silver - .999 pure silver in this case. There are several brands and varieties of metal clay - the .999 silver like these are made out of; or you can also find it in sterling silver, copper, bronze, and yes, even gold! There’s even a stainless steel metal clay product! Some of the clays have different firing requirements, but this particular clay is very easy to work and to fire. For me, working in this material is like making miniature sculptures. The colored butterflies were patina’d with liver of sulphur. It does get some amazing color, but I have a tip for you - when you set about to patina your metals, DO NOT use liver of sulphur IN YOUR HOUSE - mercy, that stuff stinks! But it sure makes pretty colors on metal, so use it in the garage, or outside, with plenty of ventilation. I made this video originally, to show someone who had asked for a custom piece with one of these butterflies. She selected the third patina’d butterfly with the swirls on front. I wonder if perhaps she chose it because the texture on the back also contains a little bonus butterfly! Butterflies, by the way, represent Metamorphosis, Change, Unfoldment, Becoming. I will be getting these put together into jewelry pieces and post them online for you at EightSusquehanna.com. Meanwhile, thank you so much for watching and reading - I appreciate your attention. You can shop my other items at http://www.EightSusquehanna.com If you want to try your hand at making something like these, you can shop Precious Metal Clay Supplies at the following Affiliate Links (I do get a small commission from any orders from these links):
PMC3 Beginner Tool Kit with Torch:  https://amzn.to/2MdK9hx 
PMC3 Beginner Kit with Hot Pot: https://amzn.to/2nnzum8 
PMC Mini-Pot Kit: https://amzn.to/2M5352Q  
PMC Syringe: https://amzn.to/2Mhm0qa  
Texture Plate: https://amzn.to/2vwPMh4 
Carving Tool Kit: https://amzn.to/2OpUYdZ 
Firing and Soldering Tripod: https://amzn.to/2novMcc 
Brass Brush: https://amzn.to/2McIBEo 
Burnishing Set: https://amzn.to/2vuRtvz 
Liver of Sulphur: https://amzn.to/2OUeBvr 
Lortone Tumbler: https://amzn.to/2M5xiyH 
Tumbling Shot: https://amzn.to/2M6e8IT 

Friday, December 15, 2017

Office Supplies

Amazon is the handiest thing ever, especially this time of year. Just need a few things, and can't bear to think about enduring the shopping crowds? Do what I did and go Amazon!


Saturday, July 6, 2013

Beautiful Black Hair Comb


This beautiful hair comb features a free-form wrapping of black glass beads, Swarovski crystals and Czech glass beads, wrapped with coordinating black wire on a clear plastic comb. 

This comb sold, but here are some other lovely combs.

Thursday, July 4, 2013

Customer Service and the Golden Rule

 My customer service policy was instilled in me by my Grandmother, who always said to treat others the way I'd like to be treated (the Golden Rule).

One result of that is that the things I make for sale are things I like, beautiful things. If I like what I have made, somebody else probably will, too.

I use quality materials and techniques in my work. 

I offer my creations at a reasonable price. 

I ship quickly.

When you place an order with me, a special service I give is that each handcrafted jewelry item comes to you packaged in a giftable box wrapped with ribbon. Ribbon color is based on availability and is tied in a simple bow so you can easily open it. Inside the box with the jewelry piece I include a tag or business card without pricing information, in case it is a gift for someone. 

The pricing information is included in the shipping box and on the shipping invoice. If you prefer that NO pricing information be included in the shipping box at all, just message me or let me know in the "Special Instructions" portion of the order process and I will be happy to ship your order with a "blind" packing slip, and mail you the shipping invoice under separate cover.

 I try very hard to make sure that everything offered for sale in my online stores is in stock and ready to ship.  I usually ship before the end of the next business day once confirmed (cleared) payment is received.
In the extremely unusual event that an item has oversold, I will contact you  to discuss options of a back order, a slightly different item, or a refund.

If you see something you like, but want something, maybe slightly different, I do consider custom work, and of course, I certainly do repairs and rebuilds.

Don't hesitate to contact me if you have any questions at all. 
 

Wednesday, June 26, 2013

Rebuilt Bracelet

 
A friend had a bracelet that was a special gift to her. One day it broke. She was greatly dismayed because of what the bracelet represented to her, but she was able to save the pieces and brought them to me to reassemble. I added a few new parts to the bracelet, too. Since there were extra beads when I was done, I made her a keychain too!

www.EightSusquehanna.com

Saturday, January 19, 2013

Amendments


"Amend: To repair, correct, or make right."

Sometimes customers ask, "Can you do something with this?" Maybe some stones have fallen out, maybe it's a sentimental piece that has broken, or maybe they have a piece they can't wear and wonder if there's anything I can do with it so that they can wear it again. I am not a "fine jeweler" like you might find in the Diamond District or at BC Clark but as an artisan/craftsman I am very fortunate that my customers have faith in my skills and creative abilities, and I am highly honored when they ask me to work on their jewelry.

 Here are five particularly memorable cases:

  • Customer had a beautiful bracelet watch, set with crystals and cabochons, and stones had fallen out of some of the links. I was able to match the existing stones and crystals with new ones.
  • Customer had a ring that was too big. She didn't care for the setting, but she loved the stone, a lovely chevron Amethyst cabochon. I was able to reset the cabochon into a new Sterling Silver setting, much more appropriate to her style and taste, that fit her finger better. She now proudly wears that ring every day.
  • Customer had a Southwestern style belt buckle of sentimental value to her, and some of the cabochons had fallen out. She asked if I could just replace all the cabs. I found some lovely turquoise ones and did exactly that.  She is utterly delighted with her "new" belt buckle!
  • Customer had a bracelet that had been a gift, that was uncomfortably tight. I was able to construct and add links to match the existing bracelet so she could enjoy wearing it.
  • Customer had a vintage necklace of handmade shell beads that her missionary grandmother had brought back from Africa many years ago. It was an amazing piece, beaded in a particular pattern. Unfortunately, the strand had broken so that it was unwearable, and the clasp was fragile and somewhat corroded. Fortunately, she still had almost all of the beads, so I was able to add a few coordinating beads and emulate the original design on a sturdy modern synthetic silk beading thread along with a new clasp. She now has a very special necklace she can actually wear and bequeath to her own grandchildren.

I view these projects as being a little like making a quilt - taking pieces of this and pieces of that and reassembling them.  When undertaking a task like this I consider the customer's needs and tastes, balancing their requests and requirements with my own creativity and available materials. In each of these cases and more, my customers express pleasure and delight with the amended pieces I present to them. It's certainly one of the personally rewarding parts of what I do.

Next time I'll take before and after pictures!


Sunday, December 2, 2012

Home for the Holidays

I am excited to announce that I will be at Tuttle's Home for the Holidays celebration on Thursday, December 6 as one of the handcrafted vendors in the "Hearth Room.The “Hearth Room” will feature the Tuttle Band Boosters along with several different vendors with handcrafted Christmas items for sale. This takes place in the Garrett Trucking conference room, located at 304 W. Main Street, Tuttle, OK. This fifth annual holiday celebration and will take place Thursday, December 6, 2012 beginning at 4:30 p.m.

 Home for the Holidays is a free, family-friendly winter holiday event, featuring live music, food and a Christmas parade complete with Old Saint Nick himself. Bundle up your coat, pack some gloves and come on down to Tuttle to take part in this festive event on Thursday, December 6, 2012 beginning at 4:30 p.m.

Christmas Tree Earrings made with Crystallized Swarovski Elements


Wednesday, October 24, 2012

El Reno Arts Festival!

I am thrilled to let you know that I will be at the
El Reno Arts Festival
Saturday, October 27, 2012
10 AM to 5 PM

This takes place at the
Canadian County Historical Museum
300 S Grand Ave
El Reno, OK 73036-3610

There will be artists, craftsmen, dancers, musicians and more - kids' art activities, entertainment, food vendors, and classic cars!

This event is being put on by the El Reno Convention and Visitors Bureau


That's this Saturday - Come on out!

Friday, October 5, 2012

What I'm working on today.....


 This is a front-clasp necklace with a striking faceted CZ teardrop and lavender amethyst saucer beads. The whole thing measures about 24 inches. I made one to donate to a drawing for an event and another, similar one whose outcome is undecided - I haven't decided whether to put it up for sale or keep it for myself!


Swarovski Rivoli cross in black ("Jet") - done up on a leather strand with "hippie knots"
 - finally something for the men!


(...and wouldn't you know it, somebody snapped it right up, so I'll have to make another one to offer for sale online!)


70mm (2 3/4 inch) hair comb wrapped with Turquoise nuggets and coordinating beads with copper wire.

Saturday, September 29, 2012

Honeysuckle Pink Peeper Keeper Glasses Leash


Practical and charming, my clever glasses holders can help you keep track of your occasional yet necessary eyeglasses, whether you use them for reading or sun protection!


This handmade glasses leash peeper keeper measures 32 inches and is beaded with glittering honeysuckle pink glass beads and features accent sections of pink tumbled glass and Czech glass with an iridescent finish.

This one sold, but here are some other lovely eyeglass chains.

Thursday, September 27, 2012

Vermeil

Vermeil is Sterling Silver coated with yellow gold. To actually be considered "Vermeil," the gold must be at least 10kt (the vermeil components I use are usually coated in gold of between 14 to 24 kt) and the gold must be heavily applied, 2 1/2 microns thick.

Wikipedia, the free encyclopedia reports:
The Code of Federal Regulations 16, Part 23.5[2] defines Vermeil: "An industry product may be described or marked as 'vermeil' if it consists of a base of sterling silver coated or plated on all significant surfaces with gold or gold alloy of not less than 10 karat fineness, that is of substantial thickness and a minimum thickness throughout equivalent to two and one half (2½) microns (or approximately 1/10000ths of an inch) of fine gold."


Amethyst represents spirituality and tranquility, and is the birthstone for those born in the month of February.
This graceful pair of earrings features drops of stacked nuggets of  Amethyst with vermeil accents, suspended from gold-filled leverback earwires.
Lovingly handcrafted in the USA by artisan Vicki Newby.

These earrings sold, but here ae some other lovely earrings for your consideration.

Thursday, June 21, 2012

Bead-wrapped Hair Combs

Did you know I make lovely bead-wrapped hair combs?
Here are a few that I have in my online store right now - click any image to see more about it:


Amethyst represents Spirituality and Serenity.

This beautiful pair of hair combs features a free-form wrapping of purple Amethyst chip nugget beads with Czech crystal faceted oval and purple rainbow glass beads....


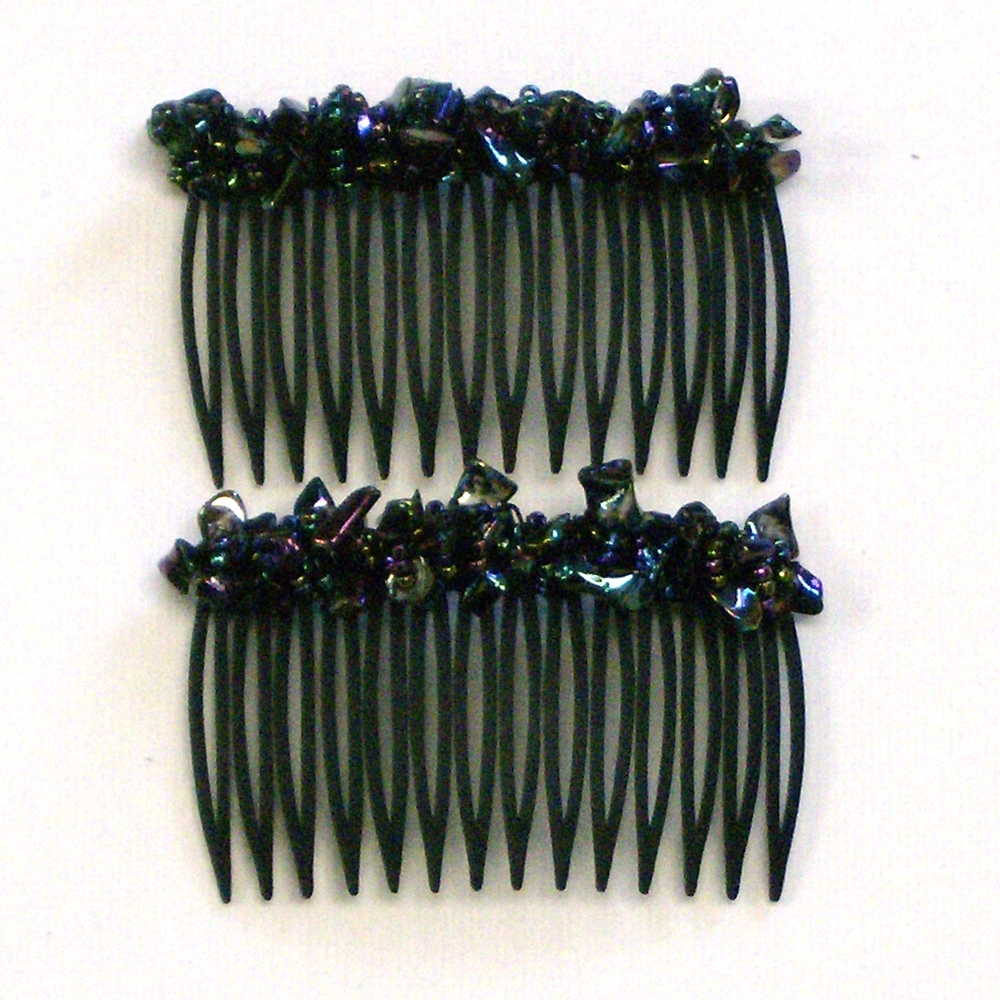
This beautiful pair of hair combs features a free-form wrapping of iridescent Black Aurora Borealis nuggets and glass beads on plastic combs.


Citrine represents mental stimulation, creativity and enhanced self confidence, and this beautiful pair of hair combs features a free-form wrapping of semiprecious gemstone citrine nuggets with glass beads on plastic combs.


Thank you for looking, and be sure to [LIKE] EightSusquehanna on FaceBook!